|
I’m not in the business of making that kind of movie. This is a site about 8mm/Super 8 movie film and the technical issues of converting film to digital video. It discusses different methods and my successful working solution which involves film scanning with a Canoscan 9000F Mark II scanner and Photoshop. |
| »› See the Films Here ‹« | 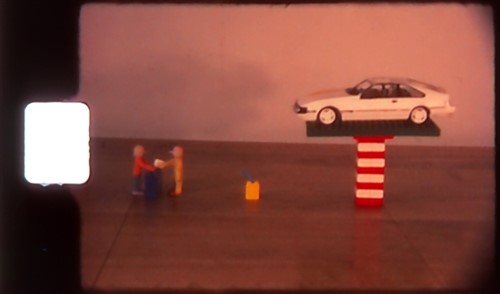 |
| »› See a YouTube Tutorial for This Site‹« |  |

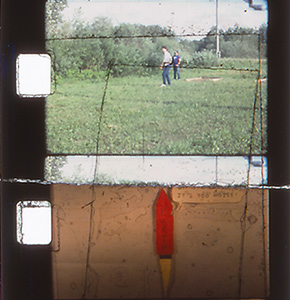
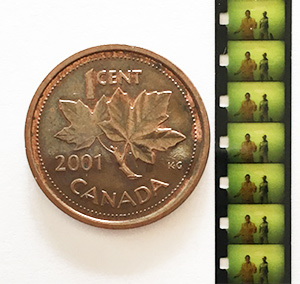
Introduced in 1932, 8mm movie film was actually 16mm film which is run through the movie camera twice in 25’ rolls and shot on the left side both times. During developing, the film is sliced down the middle and connected to make one 50’ roll. Super 8 was introduced in 1965 and was simpler to use because it came boxed in a cartridge. It also gives a larger film frame as the sprockets are narrower. In the diagram it doesn’t look like much of a difference, but the first technical problem to be overcome in converting such small-gauge film is the tiny size. It’s really small, as you can see here next to a penny.
Some of my movies were also the typical boring family movies. They are jerky and short clips, because film was expensive (about $7-10 for a 50’ roll, which was 3:42 (Super 8) or 4:10 (8mm) in shooting time; and this was 1982 money. That’s probably in effect about $5-7 a minute now. Add to this postage to send the exposed roll to Kodak in Vancouver for processing, which would return after two weeks. No wonder film is nearly dead and most animated and live films are digital. But for family members, pets, and places aged (or gone) now, these are also memories worth digitizing and preserving. There are two broad ways to do this: one can take the films to a conversion service which has specialized equipment, or do it yourself. Conversion services are expensive, whereas DIY is cheaper and more rewarding, as it offers fuller creative control. But be warned: It’s not easy, and it’s a huuuuuuge time sink. By the time I finish my ten reels of film, I will probably have invested as much time as I did on my dissertation. It has to be fun, or else DIY film transfer is insanity. |
|||||||
Transferring Movie Film to Other Formats 8mm runs at 16 fps, because you want the film to run slow enough to save film, but it needs to be fast enough not to flicker. Super 8 ran a bit faster at 18 fps, partly because Super 8 also came in sound versions, and quicker film allowed better sound quality.
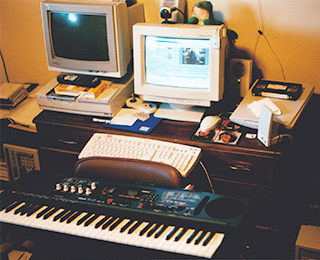
NTSC television works by scanning the picture at 29.97 fps. More precisely, every other line of resolution is scanned every 1/60 of a second, and a complete picture is assembled 30 times a second (made up of two fields of scans). Picture tubes didn’t stay lit long in the 1930s, and 60 times a second made for a more viewable picture and matched a 60 hz cycle. European power is typically 50 hz, and not surprisingly PAL/SECAM runs at 25 fps. Thus if you just aim a video camera at the screen while you project the film, the quality is bad; the image will be crooked, the lighting will be uneven, the colors will be off, and there will be a nasty flicker because 29.97 does not divide into 16 or 18 without some video frames being black. The 8mm segment here of my dog and father from 1981 is actually from a videotape I made of my films in March 1985. That same October I just gave up and went to a studio in Edmonton and had the films transferred to VHS tape. By the late 1990s I was able to capture this videotape onto my computer, and in 2001 I used Adobe Premiere to edit the films and add music and sound effects. But standard VHS outputs 250 lines of resolution, which makes for poor-quality video– I usually captured at 480x360, which is enough for a website but still doesn’t look very good on a monitor. And by this time the videotape itself was 16 years old, and VHS ages fast. Pictured here is my workspace in Fall 2001. I don’t want anyone to think I’ve devoted my life to this, but it is a project I’ve returned to several times over the decades. By January 2003 I had webcams and software such as Premiere and VirtualDub and decided to experiment again. Webcams typically max out at about 640x480, but that was certainly better than VHS. I tried some more recording off a small screen, and using software filters to straighten the image, to adjust colors and lighting, to sharpen the focus, and most importantly, to process out the flicker, the results were not great but improving.
|
|||||||
New Approaches In the last few years three new technologies have improved for potentially converting small-gauge movie film to digital files, and I have attempted to use all of them. The first two were unsuccessful, but the third is now working quite nicely. I am giving details for anyone interested in seeing or replicating what I’ve done. 1. Photographing the film directly with a digital camera. Some websites discuss this as a workflow approach. But I can’t get it to work, because no digital camera I can afford can focus on the film close enough to create a usable image. Neither my old Sony DSC-RX100 or my crappy ancient Canon Powershot could do it. Even my snazzy new Nikon 1 J5 can’t focus that small; a macro attachment rendered images clear in the middle but fuzzy on the edges (left image). But lest anyone think I’m bragging about my cameras, to a professional these are still semi-toys. What would really be required is a true DSLR with a macro bellows, and that’s in a much higher price strata. As well, earlier I said Problem #1 in 8mm movie conversion is the tiny size of the frame. Problem #2, as I learned, is registration. Ten and a half reels of film calculates out to 168,000 frames of film. In order to usefully photograph all of those frames off a digital camera, the film frame must be in the exact same place every time. Otherwise the image will jiggle and wobble and be useless. Thus I’d need not only professional cameras, but also film holders and other high-precision instruments to secure film at close tolerances. Not happening. 2. Photographing the projected image frame by frame with a digital camera.
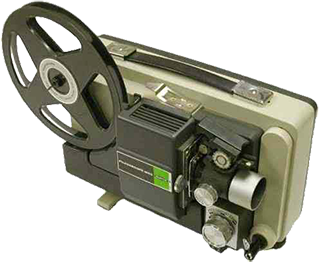
Because I never, ever throw anything away, I still have in Korea one of the three movie projectors I’ve ever owned– my Fujicascope M25, which I bought in September 1982 and which you see in the upper photograph. As digital cameras now shoot video at high resolution, and some even do 60 fps, it seemed straightforward to try filming off a small screen. It still didn’t work. The picture remained flickery. What I decided was that I needed to slow down the projection speed so that I could advance the film one frame at a time and capture it as individual photographs. I had tried reducing power to the motor years before in a similar experiment with a light dimmer, but that didn’t work (and scorched a patch of carpet when the dimmer burned out). A more draconian measure was required, which was to tear out the projector’s motor. Some ingenious designers on the web have created systems where the film creeps along and triggers the camera. I can’t do that, but during a visit home my father welded me a small metal crank which I connected to the flywheel. I also had a remote release for the Canon G10. This also required that I remove the original tungsten lamp from the projector, a CXR/CXL 8V 50W model. This bulb is intense but very hot, and doesn’t fry the film only because it passes by too quickly at 16/18 fps to heat up; but if the film were motionless it would melt in seconds. I also bought a wooden plank to strap everything in place to, and raised it off the floor with some adjustable floor stops left over from some IKEA furniture so that the vibration wouldn’t bother neighbors below. With a good, thick Chaucer book to elevate the camera to a reasonably straight-on position, I was ready. The problem was the crank, which not only made a horrible kuh-krannkk-squeak-kuh-krankk-squeak noise which drove my wife crazy and scared the cats, but it also jiggled everything around slightly. And turning the crank to advance one frame was a terribly slow way to go.
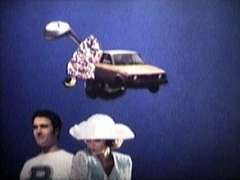
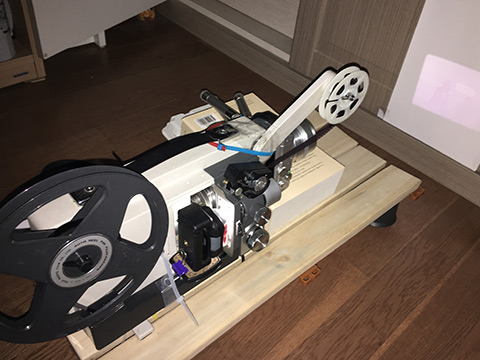
So far I had spent about $40 on my DIY project, and decided to motorize the film advance. The motor’s slightly noisy, but not nearly so bad as the crank. By then my thinking had evolved to capturing HD video on the digital camera instead of individual photographs, because the motor was turning the film at about 4 fps. That’s slow, but I can’t sustain exactly four shutter presses per second at the right time, and the camera can’t sustain that rate anyway. But if I had the video file, I could probably find some filter to take out the black patches, or in a worst case I could quickly select the good video frames and delete the bad ones by converting them all to image files and then looking for the duds in File Explorer. [Yes, I have a silly cartoon with Hitler in it. He gets crushed by a giant weight and the goose wins the game show. No, I’m not a Nazi. Hard to believe in 2018 I must clarify that.] But by this time all of the problems of this approach were beginning to pile up. I could convert the video file to a series of jpg images, and I even wrote a batch file in Photoshop to adjust for the camera filming at a slight left angle (I couldn’t bring it perfectly straight without blocking off the light). But this is a forty-some year old projector from the mid-1970s, and it’s tired. Besides the ever-snapping belt, the sprocket was not pulling the film to the precisely same place each time, and checking the horizontal registration for each frame to eliminate the off-kilter ones would be impossibly laborious. I tried different VirtualDub and Premiere filters to DeShake and stabilize, and tested some of Fred’s Scripts with AviSynth. Optimally, one could align images by the sprocket hole for perfect registration. But the film gate, in addition to blocking off about 10%-20% of the precious tiny image, also hides the sprocket hole. Plus the image looks grainy and seems to accentuate scratches, and there’s always dirt in the bloody gate. After giving my computer enormous batch tasks and letting the poor thing chug all night while I slept, trying to process all of these frames, my “factory” clearly wasn’t working out. |
|||||||
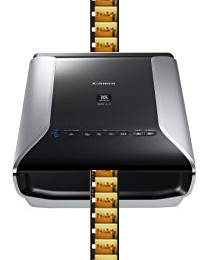
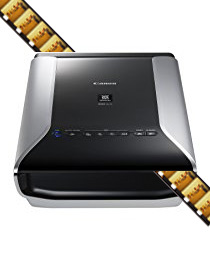
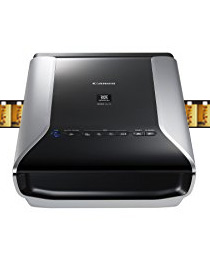
It Finally Works The third solution was to try a flatbed scanner again. The difficulty is that it needed to have a transparency function, and had to at least perform a 4800 dpi scan. At this point I had to consider whether it wasn’t becoming cheaper to take the films back to a transfer studio, or to try buying a dedicated film scanning unit such as the Wolverine. But these units have mixed reviews, and I needed a scanner for office work anyway. They are also getting cheaper. I tried an Epson V370, which was defective and scanned the colors in misaligned layers; after sending it back, I reluctantly spent about $280 on a Canoscan 9000F Mark II in February 2018. It was a good decision. I’ve always liked Canon, and this experience hasn’t changed my mind. Just as the cameras feel solid and have the buttons in the right places, this is a boat anchor of a scanner that has a strong, bassy growl to it. The rrrrm of the return scan is certainly better than kuhh-krannk-squeak. It has admittedly taken some time to create a functional method for movie film scanning, and there are lots of online detractors saying this doesn’t work or that the quality is poor. My friend and previous co-worker in Germany Lutz Garmsen still recommended using a better DSLR camera and bellows as discussed earlier to shoot directly into the projector lens. But so far I’ve been getting good, rich scans and focus is slightly soft but fixable in software. There are some nice functions such as Canon’s dust-detection algorithms, but they slooowww down scanning so much I just planned to try to work this out in some batch process later in Photoshop. I just did the raw scans at 4800 dpi and saved them as tif files to get it done.
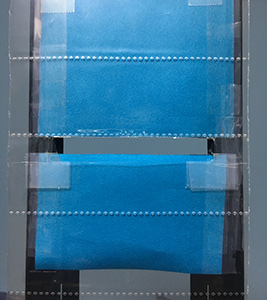
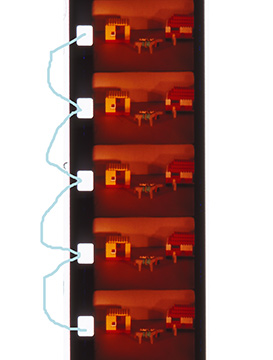
One of the first issues is that even if the transparency unit will allow you to lay anything you want along the vertical middle of the scanner, you can’t use the entire 11” vertical space at one time. The scanner reserves a small horizontal strip at the top and bottom to align and check itself every time it scans a transparency, and this area needs to be kept empty and clean. Thus a vertical line of film going upwards across the scanner as in picture 1 below won’t work unless the film is cut. Not happening.
I thought I would get cute and try picture #2, which is advancing the film diagonally so as to dodge the registration area during transparency scan. This did work, but it means an enormous area needs to be scanned and saved, and it was taking minutes to scan and chug through saving a 3.1 GB 13328 x 41654 image for each section. Unfortunately, the only time-efficient (and time really needs to be efficient when there’s 168,000 frames) method was to go horizontally, left-to-right across the flatbed (picture #3). As the transparency handles 8.2 cm width, that allows 16 frames of Super 8 or 17 frames of 8mm at a time– roughly one second of film time per scan.
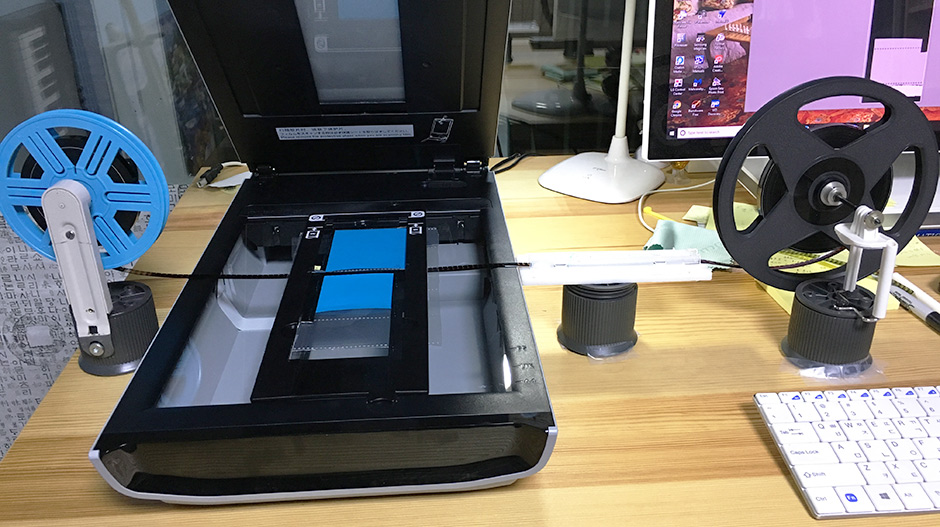
Advancing the movie film in counts of 16 frames each time gets wearisome fast. I reasoned that if this can be measured out, I just need to slide the film between visual markers. I don’t want to scrape the flatbed scanner, so I built a small stand next to the scanner out of an IKEA riser and a small piece of plastic. Then I took two old CD jewel cases and cut them so that their edges face each other and glued them so that they form a tight path for the film to move along. After marking out 16 Super 8 and 17 8mm frames, I just used a tiny screwdriver to slide the film sprocket along from the left S to the right S. Then, I tore off the support arms from the old projector to make a stand to hold the supply reel, and took apart another smartphone tripod from a dollar store (in Korea the chain is called Daiso) to make a takeup reel stand. I had to turn the reel manually, but such is life.
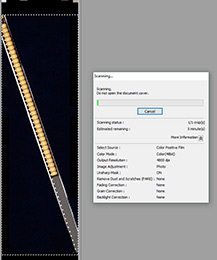
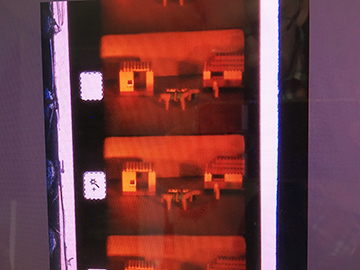
This is what ScanGear, the Canon scanner software, shows. I tried VueScan but don’t really like it. I used a selection of 2.77” x 0.43,” and this gives a tif scan of 13328x2124 at 157 MB. I scanned at 48 bit color at 4800 dpi with unsharp mask on. I could go up to 9600 dpi, but it gets super-slow, and apparently the scanner’s “true” resolution can’t go that high anyway.
This is the whole system, which probably ran me about ten dollars for mini-tripods, glue, tape, paper, and ties, not counting old CD jewel cases or chunks of plexiglass from my junk box. Once I had a solid rhythm going I could scan and save two sections of 16 frames in just over a minute if I temporarily store to a solid-state drive. 0.5 fps isn’t a great rate, but there’s no rush. Two hours of this gets a 50’ roll done. Below I have a raw scan (resized down) of Super 8 and Regular 8. As I keep stressing, you should either do this because you have to because of budgetary reasons, or because it’s fun. If it’s not fun, it’s awfully mindless drudgery. And the hardest part isn’t done yet; that will need some computing dexterity.
|
|||||||
The Magic (Wand) That Makes it Work Each reel results in about 900 scan files of 16 frames each, for 13,000 individual frame images. Once again, using a photo editor to cut out each one of these frames, and with consistent registration, would be ludicrously time-consuming. This requires software help. The first task was to use a batch file in Photoshop to flip the images 90 degrees so they are up-and-down, which is easily done. The more difficult problem is to write a routine which would crop and save each frame as a separate image file– and this is complicated by the fact that every image scan is slightly crooked. Perhaps if I had bespoke precision metal film guides to hold the film this wouldn’t be an issue, but with cardboard and plastic the tolerances can only be gotten down to millimeter levels of wiggling around, and with a 6mm film frame a millimeter makes a big difference. Simply put, I just can’t get the film to slide through the scanner perfectly straight. I solved the problem of recognizing the film frame’s dimensions by its sprocket hole first, and the issue of perfect alignment of the 16-frame image second, but I’ll treat them in order. First the 16-frame column needs to be vertically straight before we can clip out the frames individually. This could be done with Photoshop’s ruler tool, but that’s some 10,000 files! After digging around and looking at Fred’s and other sites, it seemed to make sense to use a Photoshop batch script to automate this drudgery. But Photoshop also allows a more direct level of action scripting which is basically easy JavaScript. I can’t do C++, but this is accessible even to a soft liberal-arts brain.
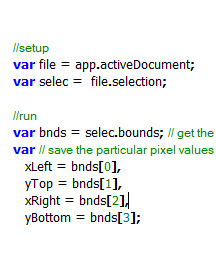
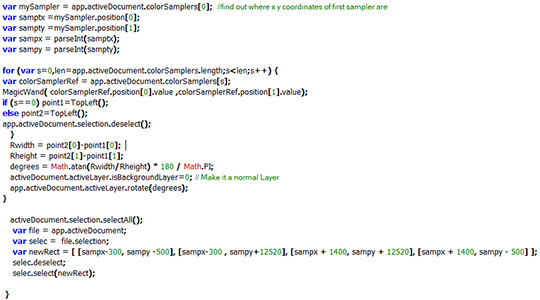
My first action script attempt analyzed the top left position of the sprocket hole selected and then compared it to the bottom right position. By measuring the difference between the x (left-to-right) difference of the two positions, the script can tell Photoshop how much angle correction is needed and do a rotate. But this didn’t work very accurately because it isn’t true triangulation, and because the script becomes confused as to whether the image is titled downward toward the left or the right. I needed help, and the nice people at the Adobe forums suggested some code for me, in particular JJMack. I couldn’t figure out how to obtain the coordinates for two Magic Wand selections, and the mathematics of the triangulation was beyond me. John helpfully advised that I use the color sampler tool instead. This all sounds hard, but it’s the coding and not the processing that’s time-consuming. The action code did require me to initially make the two color sampler selections for each file, but that only takes a few seconds, and after then I just press a function key in Photoshop to execute a batch file which runs John’s script and saves and closes the result. For good measure I also added in some lines which use the first color sampler coordinates to shave off some pixels off the top of the image, so that the first sprocket hole will be in about the same y area in each file. This will be important in the next step. After doing this step, we need to clip out each frame into its own image file so that we can string them together in VirtualDub and then Adobe Premiere for editing. This actually turned out to be easier than I thought, because our images have sprockets on them, and if we can capture the coordinates of the Magic Wand and make a rectangle of the sprocket hole, we just need to extend the rectangle by a predetermined size to capture the entire film area.
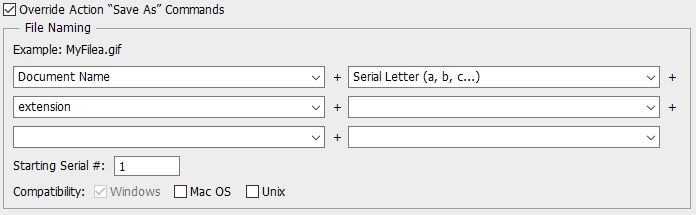
My actionscript code for this can be downloaded here. Compared to John’s it’s simple. It takes the coordinates of the Magic Wand selection and then expands them outward in each direction so that the entire frame is selected. This way each frame will have the sprocket hole in the same position and will be registered correctly. I can crop and make things pretty later. The point is that each frame image is exactly the same size with the sprocket in exactly the same place. This would still require that I use the Magic Wand on each of 168,000 frames to make that initial selection. But there’s a cheat to this. Remember, with the Magic Wand, close enough is good enough– you just need to be somewhere inside the sprocket hole to select it, and the wand will fill out the rest of the sprocket. If so, then that can also be recorded as a batch action in Photoshop. This is a hack solution, and you do need to program the steps carefully in the batch command, but it works surprisingly well and gives a final frame image of about 1130x780 for Super 8, which looks fine. Sometimes Photoshop crashes, mostly when the script runs across a broken sprocket hole or rough splice, but for one of my reels with some 13,000 frames I had only a few dozen misrecognized ones, which are easy to spot in File Explorer; that’s an extremely low failure rate. With the 8mm frames, because the sprocket is so large and it’s hard for the batch process to miss it, the failure rate nears zero. It’s a nice trade-off for losing so much precious image real estate to the stupid sprocket in Regular 8mm. Note that different script settings are needed for Regular 8 film as the sprocket is not only larger, but is on the top and bottom left of a frame rather than in the middle. I used var newRect = [ [xLeft-180,yTop +70], [xLeft-180,yTop+870], [xLeft + 1350,yTop + 870], [xLeft + 1350,yTop +70] ];. When the batch script is run in Photoshop, a last problem is that the script keeps rewriting the same film frame over and over, erasing previous single frame files. But that is solved with yet another hack; have Photoshop add a serial letter to the end of each file, so that it doesn’t overwrite the prior one. The resulting folder is a sea of duplicate letters, but so long as the files are in the right order they can all be renamed by Window’s rename function in File Explorer. Select all the files, right-click on the first file, name it, and then all files will be incremented.
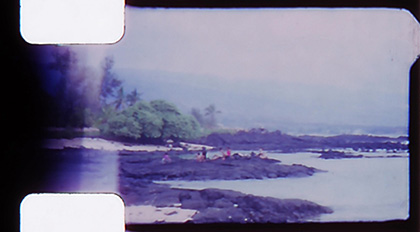
Another nice feature of Photoshop is the ability to fix badly overexposed movie film. I shot some film in Kailua-Kona in 1992 on an ancient Brownie 8mm camera which had all-manual settings, and chose too high an f-stop. In Photoshop, choose the yin-yang looking moon icon under layers, choose levels as the option, and then change from normal to multiply in the settings next to the layer image.
Last, before I separated the strips into frames I did some light cleanup of dirt spots on the frames in Photoshop, and then let VirtualDub’s dirt and scratch plugins filter out some of the minor deritrus. As I’ve repeatedly stressed, this entire process needs to be time-efficient, as there are so many frames, and so at some point good enough has to be good enough. As well, it’s Super 8. It will never look as clean and pure as digital video will, but at some level, that’s a feature: Part of the attraction of Super 8 is its gritty, earthy look. Some crazy people spend their time adding filters to give video this scratchy, filmic look. With 8mm, it’s already there, whether you like it or not. |
|||||||
Here’s a finished example. This is “Jello Morning” with me and my friend Mark Peebles, filmed in December 1993 in Edmonton, Canada. You can watch a gallery of finished films on my view page.
This answers the question, “how do you do this?” Comments? Contact Ken. |
 Unlike the continuous signal of analog sound, movies
are strips of single pictures, which run anywhere from 16 to 24 frames
per second. This rapid motion fools our eyes into seeing constant motion. Professional and semi-professional film is made
in several increasingly expensive sizes such as 16, 35, and 70mm
for educational and theatrical films, all the way up to IMAX film, which of course offer far greater optical resolution. As film is analog it’s not possible to relate it in pixel sizes, but I’d say 8mm/Super 8 is usefully about 1000 pixels wide. I’d say it can beat the resolution of any amateur-grade video camera image up to the mid-late 1990s– although now even an iPhone can capture much better and clearer images. One advantage which film does have is that because the grain is in random places as opposed to a fixed pixel grid, when we see it at 16-18fps our eyes again fill in the missing information to give the appearance of a better image.
Unlike the continuous signal of analog sound, movies
are strips of single pictures, which run anywhere from 16 to 24 frames
per second. This rapid motion fools our eyes into seeing constant motion. Professional and semi-professional film is made
in several increasingly expensive sizes such as 16, 35, and 70mm
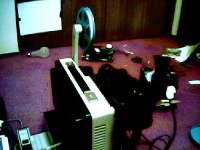
for educational and theatrical films, all the way up to IMAX film, which of course offer far greater optical resolution. As film is analog it’s not possible to relate it in pixel sizes, but I’d say 8mm/Super 8 is usefully about 1000 pixels wide. I’d say it can beat the resolution of any amateur-grade video camera image up to the mid-late 1990s– although now even an iPhone can capture much better and clearer images. One advantage which film does have is that because the grain is in random places as opposed to a fixed pixel grid, when we see it at 16-18fps our eyes again fill in the missing information to give the appearance of a better image. 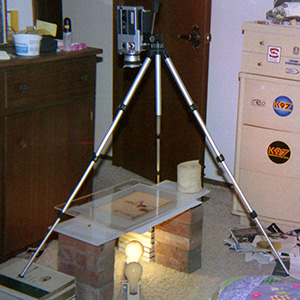 Here you can see my shooting stage in October 1985. Animation, whether done with plasticene, paper, cels, or computers,
is created by shooting 1-2 frames at a time and changing the picture
between each shot. Animation requires lots and lots of light. 8mm and Super 8 is
usually 40 ASA (there was 160 ASA, but it was so grainy as to be nearly unwatchable). That’s not very fast. You have to be careful
when animating things such as plasticene clay as it gets too warm and starts to soften. I used to take breaks and put my set on ice, literally.
Here you can see my shooting stage in October 1985. Animation, whether done with plasticene, paper, cels, or computers,
is created by shooting 1-2 frames at a time and changing the picture
between each shot. Animation requires lots and lots of light. 8mm and Super 8 is
usually 40 ASA (there was 160 ASA, but it was so grainy as to be nearly unwatchable). That’s not very fast. You have to be careful
when animating things such as plasticene clay as it gets too warm and starts to soften. I used to take breaks and put my set on ice, literally.
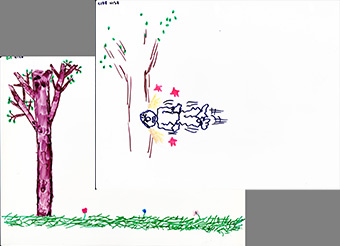 If it moves, you can animate it. Some of my animations were done with Lego, models, cutout photographs, pictures from magazines and catalogs, clay, or drawings, but I also animated people, which is called pixilation. In later films I used to buy sheets of plastic transparencies (cels) and draw on them with Lumocolor felts, which were washable if I made mistakes. The advantage of using cels is that you can stack them, so that you only need to draw the tree once for the scene and you can have the hero crash into the tree on upper layers– or you can rotate the background on a roller so that Fred Flintstone can run through the same living room forever. This was how traditional cartoons with Bugs Bunny or Yogi Bear were made.
 The other route which was becoming a possibility was to use a flatbed scanner to capture the film. In 2004 consumer models were becoming affordable enough and I purchased a Canon LIDE model with a transparency adapter. This worked well enough for 35mm film, but for movie film it was clunky and scanned at 2400 dpi, giving me about a 500x390 pixel image, which at the time didn’t nearly justify the potential labor involved. Again I gave up and went to a film transfer studio in Summer 2006, this time obtaining DV-cam 8mm and S-VHS tapes with about 400 lines of resolution. With screen capture this provided a viewable 640x480 window, which wasn’t bad, and after using Premiere to re-edit that fall, the results were acceptable. As of now these are still the versions on my film site.
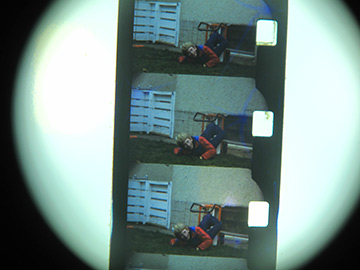 My Canon PowerShot G10, still a tough workhorse, did a not bad job (right image); at 14.7 megapixels I could finally create a usably-sized image.
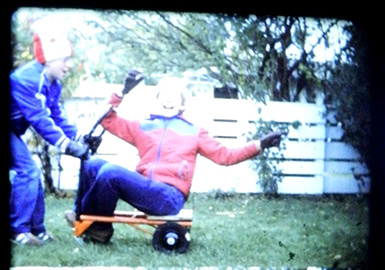
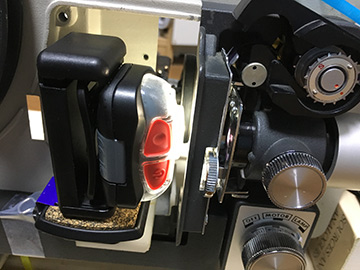 Fishing around at HomePlus in January 2018, I found an Energizer bicycle lamp with a bright LED illumination. I think mine is the 300 lumen model, and it was bright enough to illuminate a paperback-book area very nicely. I glued a tripod shoe bracket in place and screwed in the top of a smartphone holder from the dollar store, and wedged the lamp in that.
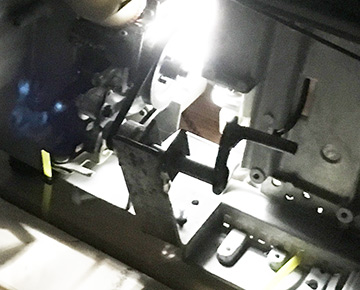
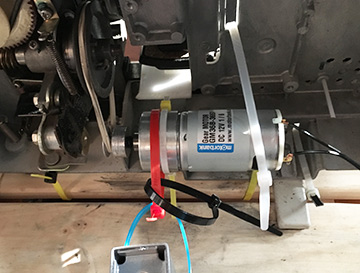 As English professors don’t generally get much training on the classification and wiring of motors, this took a while– I wanted something safe which was less likely to burn down the apartment, and so I looked at DC motors around 12V; I wanted something which would run slowly, yet I wanted something strong enough to turn the projector flywheel. I considered a turntable motor for microwave ovens but couldn’t find one that would rotate fast enough. I finally bought a geared 12V motor that ran at about 200 rpm, a GM-36B. This was about $25 and was delivered in a few days (you can order anything in Korea and it will arrive in a few days). I hooked up a switch and the strongest power adapter I could find, and it spun very nicely– excepting the rubber belt on the flywheel, which being some fifty years old, didn’t like the stress and began continually breaking. Before switching to a rubber band the belt was probably one-quarter Krazy glue.
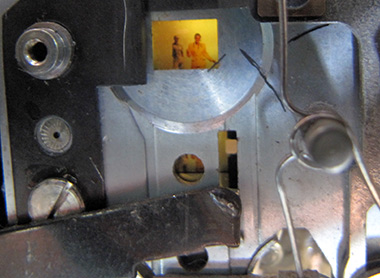

 Although the Canon software, even with most gizmos turned off, does a good job of setting exposure settings on the film, I gave it some help by making a mask out of cardboard and taping it to the underside of the large-format tray (with flaps cut). This also provides a visual guide to aligning the film and marking sprocket holes. I found some transparent 35mm negative sleeves and cut them shorter to secure the film, so that the film enters and exits a narrow sleeve and is held reasonably straight. At first I had the sleeve cover the film overtop to place some weight on it, so that it would be held flat against the scanner plate. But this just filled with dust and dirt, and so I went commando after a while. Usually movie film in reasonably good condition will lie perfectly flat if it’s straight. Occasionally, where the film is slightly damaged or has a nasty splice in it I weighed it down with a quarter on the edge of the sprocket. The Canoscan’s focus can’t be adjusted, so having the film close to the glass is important.


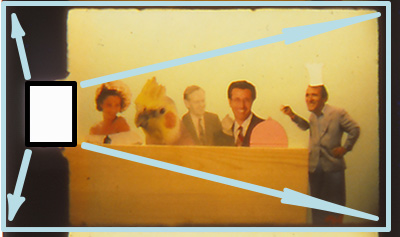
 Photoshop’s Magic Wand tool is what saved this project from trudging back to the conversion studios in Canada. Magic Wand’s strength is that you don’t have to be exact; like horseshoes and handgrenades, close enough is good enough– so long as you select inside the sprocket hole white area, it will fill out the sprocket selection area nicely once you’ve set the tolerances.
 What his script does is that the user selects a white point within the sprockets of the topmost and bottommost frames, and then a line of code searches left and right to find the limits of that white color, which are the x1 and x2 bounds of each sprocket hole. The code then looks at the y (up-and-down) difference between the two sprockets and does a calculation to render the rotation percentage required to straighten the image.
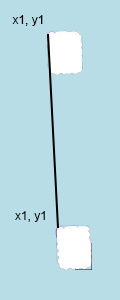

 So I recorded an action where I did this: 1) select frame one sprocket hole with Magic Wand; 2) execute script to extend selection size to entire frame; 2) crop and save; 3) undo; and then select frame two sprocket hole and do the same three steps, and on for all sixteen frames. If Photoshop’s batch menu is set up for it, it will increment a number on the end of each file so that each frame is saved with a higher number. Photoshop then just has to be given the batch command to execute all files in a directory, and then it can be left alone to process them.